 Supplies: Falling Leaves stamp, Soft Suede ink & cardstock, Dusty Durango ink & cardstock, Whisper White cardstock, Sahara Sand cardstock, 1-1/4" & 1-3/8" Circle Punches, Scallop Circle Punch, Soft Suede Polka Dot Ribbon, Texturz Plates Kit #4 for the Big Shot

Monday, August 31, 2009
Textured Grateful Card
Here's another card we made at Saturday's card class. We used the Texturz plates to do the background on Sahara Sand. (Tip: Spritz your cardstock with water -- or add a piece of cardboard under the texturz plate -- to get a deeper impression.)
 Supplies: Falling Leaves stamp, Soft Suede ink & cardstock, Dusty Durango ink & cardstock, Whisper White cardstock, Sahara Sand cardstock, 1-1/4" & 1-3/8" Circle Punches, Scallop Circle Punch, Soft Suede Polka Dot Ribbon, Texturz Plates Kit #4 for the Big Shot
Supplies: Falling Leaves stamp, Soft Suede ink & cardstock, Dusty Durango ink & cardstock, Whisper White cardstock, Sahara Sand cardstock, 1-1/4" & 1-3/8" Circle Punches, Scallop Circle Punch, Soft Suede Polka Dot Ribbon, Texturz Plates Kit #4 for the Big Shot
Sunday, August 30, 2009
Convention Swap Card CASEs
I had a great time stamping with my girls in Springfield on Saturday. We did a card class and made five different cards (2 of each) using new In Colors, new stamps, new punches...a little bit of everything. Two of the cards we made come straight from my Convention swaps cards! These were two of my favorite cards. I love the clean and simple style. Each one seems to have just the right finishing touches.
 I just love this color combination!
Supplies: Thoughts & Prayers, Chocolate Chip marker/ink, Always Artichoke marker & cardstock, Rich Razzleberry ink & cardstock, Whisper White cardstock, Circle Scissors Plus, Razzleberry Lemonade DSP, Scallop Edge Punhc, 1/4" Always Artichoke grosgrain ribbon
 I always forget about this classic "Spotlighting" technique. I love it!
Supplies: Autumn Days, Sincere Salutations, Bashful Blue marker & cardstock, Chocolate Chip ink & cardstock, Pumpkin Pie marker & cardstock, Vintage Brads, 1-1/4" & 1-3/8" Square Punches, Mat Pack, Paper Piercer
Friday, August 28, 2009
Twick of Tweet Swap Card -- Vote for Your Fave


This stamp set, Twick or Tweet, appears inthe Holiday Mini Catalog. Only a few more details until it starts. Check back on September 1st to check it out and place an order.
Supplies: Twick or Tweet, Crushed Curry marker & cardstock, Pumpkin Pie Patterns DSP & marker, Jet Black Staz-On Ink, Basic Black cardstock, Whisper White cardstock, 1-3/4" Circle Punch
Free Gift for New Demonstrators
REMINDER
Today is the last day for the $85 In Color Starter Kit Special.
Click here for all the details.
Today is the last day for the $85 In Color Starter Kit Special.
Click here for all the details.
In addition the bonus In Color sampler I am offering this month, I'm also saving this pair of cardstock and color combo rings for the very next person to join my team. Will it be you?
 Ready to join? Visit my website and enter the password: juliedavison.
(Note: Some people have reported having problems entering their card card information while using Internet Explorer. I recommend Mozilla Firefox. If you have problems, please email me at julie at the-davisons.com.
Friday Freebie #7
It's Friday! More free stuff to give away...a bookmark that I made at Convention 2008 and a little swatch book of color combinations. The combinations are from my DSP sampler book last year. The combinations are still inspiring will be sure to help you find some stamping mojo.
 The winner of this Friday Freebie is
New to Friday Freebies? Here's how it works: Each Friday I will choose one person to win my freebie (which may range from a stamped project to free product). I will choose the winner from all of the comments left on other posts during the previous week (Saturday-Thursday).
 The winner of this Friday Freebie is
-
That fish is soooo cute ! Thanks for the detailed punch and cut directions. I love the watery effect you achieved by using the rubber bands. It looks great !
New to Friday Freebies? Here's how it works: Each Friday I will choose one person to win my freebie (which may range from a stamped project to free product). I will choose the winner from all of the comments left on other posts during the previous week (Saturday-Thursday).
Thursday, August 27, 2009
Hello Hinged Box
Did you notice I put a new "Search" box on my blog? I hope you will find it useful for finding older project posts.
Today's project is straight from Convention. This was one of our make and takes and I did this project with my stamp club this month. I copied the pattern for my club members. If you'd like the pattern, schedule a party with me in September or October and we'll make this project (or another version of it for a holiday).
 Live too far away to have a party with me? Place an order on my website between now and September 30 and I'll stamp up one of these boxes for you and send it with the pattern.
 Supplies: Hello Again, Retro Remix Stampin' Around Wheel, Old Olive ink & cardstock, Crushed Curry marker & cardstock, Melon Mambo marker, Bermuda Bay ink, Whisper White cardstock, Modern Label Punch, Melon Mambo Polka Dot Ribbon, Clear Rhinestone Brads
Order Stampin' Up! Products Online, Anytime!
Tuesday, August 25, 2009
Altered Magnet Strips
You might have spotted these in the corner of my Growth Chart photos...I have metal strips from IKEA screwed into the wall to hang the children's artwork.
 I altered the magnets with some simple stamping from the Cheep Talk stamp set and punched with the 1-1/4", 1-3/8" and Scallop Circle Punches. The embellishment was adhered to the existing magnet with a Pop Up Glue Dot.
 This was just a simple way to dress up the magnets. My upline, Kim Peck, designed a much more elaborate alteration to one of these magnet strips at her downline pizza party in July.
 Sorry the photo it's clearer...we covered the metal strip with Thoroughly Modern DSP and Modge Podge. Instead of screwing it in to the wall, we used the holes for the screws and attached a piece of Bermuda Bat Polka Dot Ribbon. The magnets are embellished with the 5 Petal Flower Punch and the new Butterfly Punch that coordinates with the Flight of the Butterfly stamp set.
Monday, August 24, 2009
"For All You Do" Purse & Card Kit
 The soft, elegant colors of the Cottage Wall DSP paired with simple, striking card designs and a unique card purse will make this a project you’ll want to turn to over and over again!
"For All You Do" Class
Date: Sunday, September 27th , 2:00 pm
Location: My home, Champaign, IL
Cost: $19.95
Please call or email me to sign up for this class.
Live too far away or can't attend? Buy the project kit to go and I'll send you the pre-cut cardstock and a step-by-step photo tutorial to create these projects on your own at home.
For All You Do Kit
$19.95 + shipping
$19.95 + shipping
Note: This Project Kit is not available for Demonstrators.
Please email me (julie @the-davisons.com) for more information.
Please email me (julie @the-davisons.com) for more information.
Punch Fish & Rubberband Waves
I saw Jenn Sannes' anniversary card earlier this summer and fell in love with her little punch art fish. Jenn's style is clean and simple and I am often inspired by her "Simple & Sincere" cards. I combined the little punch fish with some rubber-banded brayered waves for this thank you card.
 To make the background, wrap a couple rubber bands around your rubber brayer, ink, and roll. You could also use this technique for grass or party streamers. I used the 1-1/4" Circle Punch at the top to make the waves.
Here are the pieces you need to make the fish:
 Supplies: Think Happy Thoughts, Bermuda Bay ink & cardstock, Crushed Curry cardstock, Melon Mambo cardstock, Whisper White cardstock, Scallop Edge Punch, 1-1/4" & 1-3/8" Circle Punches, 1/2" Circle Punch, 1/4" Circle Punch, 5-Petal Flower Punch, Heart to Heart Punch, Double Circle Punch, Brayer, 2-Way Glue Pen, Mini Glue Dots
Sunday, August 23, 2009
Faux Metal Pretties Card
The combination of the soft Pretties Kit flower and the metallic embellishments make this card stand out.
 I used the Faux Metal technique for the center of the flower. Start by inking your cardstock with Versamark and heat emboss with Silver embossing powder. Apply more Versamark and more embossing powder for a total of 3 layers. As you finish heating the third layer, quickly ink your stamp with Versamark and stamp into the hot embossed cardstock, leaving an impression from the rubber stamp. (Inking in Versamark before stamping will help protect your rubber.) Make sure to press down firmly and lift straight up to get a good impression. I punched the image out with the 1-1/4" Circle Punch and added a clear rhinestone brad to attach it to the flower.
 Ordinarily, I feel like a card is naked with a greeting on the front, but I let it slide this time and punched and layered a greeting for the inside. (Forgot to get a picture of that, sorry!)
Supplies: True Friend, Versamark, Whisper White cardstock, Brushed Silver Cardstock, Rich Razzleberry cardstock, Silver Embossing Powder, Pretties Kit, 1-1/4" Circle Punch, Razzlberry Lemonade DSP
Saturday, August 22, 2009
Makeover Reveal: Smiling Pumpkins
 Earlier this week, I posted a card that I wasn't quite happy with and asked for your comments and suggestions to finish it off. Last night, I gave my card a makeover. I like it better now, but still can't decide which one I like best. Leave me a comment and vote for your favorite makeover.

Card B: I cut the Top Note in half the long way and layered it with Basic Black. Instead of brads, I added paper buttons (Buttons #5 Sizzlit). The card size is slightly different -- 3-1/2" x 5".

Card C: [The card looks grey, but it's still Perfect Plum.] This is the same as Card B, but I added a bow on the strip of ribbon. I can't decide if it makes the card too busy.
Let me know what you think! Leave a comment and vote for your favorite makeover: A, B, or C.
Supplies: Twick of Tweet, Whisper White cardstock, Jet Black Staz-On ink, Old Olive marker & cardstock, Pumpkin Pie marker & cardstock, Basic Black cardstock, Top Note Die for the Big Shot, 1/4" Basic Black Grosgrain Ribbon, Cast-a-Spell DSP, Buttons #5 Sizzlit
 Order Stampin' Up! Products Online, Anytime! Go to http://juliedavison.stampinup.net and click "Shop Now".
 Order Stampin' Up! Products Online, Anytime! Go to http://juliedavison.stampinup.net and click "Shop Now".
Friday, August 21, 2009
Friday Freebie #6
Look who got into my Holiday Mini Catalog order after it arrived last week! My baby girl is 10 months old already, can you believe it?! And last week, she started walking! As you can tell from these photos, she loves to get into everything!


I wish I could post the Holiday Mini Catalog for you to see, but I'm not allowed to do that until September 1st, so be sure to check back then. This mini catalog is a big one and full of fabulous new stamp sets, ribbon, dies, and brand-new products -- jewelry (charms) and digital scrapbooking software (release date yet to be announced). There are also new hostess sets in this mini catalog, so get on the phone right away and call me to book your next workshop!
Ok, on to our Friday Freebie! Thanks for all the great comments this week! I especially enjoyed the comments on that Smiling Pumpkins Need Makeover post. I'm took some of your suggestions and will post a new photo of the card later tonight.
Today's Friday Freebie winner commented on that card:
erin1805 said...
I think the top note would be cute accented in a darker color behind and maybe some cut out stamped spiders tied in twine as an added accent.
August 17, 2009 1:11 PM
Barb, I'm pretty sure that's you, right? Send me an email to confirm and I'll mail out your freebie -- sample of some of the new Christmas Cocoa Speciality paper from the Holiday Mini Catalog! (It has metallic touches and includes 2 single-sided flocked designs!).
New to Friday Freebies? Here's how it works: Each Friday I will choose one person to win my freebie (which may range from a stamped project to free product). I will choose the winner from all of the comments left on other posts during the previous week (Saturday-Thursday).
Wednesday, August 19, 2009
Watch Me Grow Book
The new Decor Elements Growth Chart (#117519, $24.95) is so darling! I put it up in our playroom over the weekend. It was pretty quick -- just make sure you have two people for the main ruler part!
 I used the bird from the Birds & Blooms Sizzlits to creater markers with each child's name to mark their height.
 We don't plan to be in this house forever, so I don't want to leave marks on the wall (that's one thing I love about Decor Elements is that you can remove them without leaving a mark!). I made the bird markers movable and will take a picture of the kids by the growth chart marker so that we'll have a record on how tall they are at various milestones. Here is the little book I made up for the pictures.
 The pages are 5" x 5" Kraft cardstock. I used the Crop-a-Dile to punch holes and bound them together with a 1" binder ring. The tree trunk & bird on the cover are from the Season of Friendship stamp set and the tree top and leaves are from the Scallop Circle Punch.

 Supplies: Growth Chart Decor Elements, Season of Friendship, Kraft cardstock, Regal Rose cardstock, Sage Shadow cardstock, Chocolate Chip ink/marker & cardstock, Whisper White cardstock, Large Oval Punch, Scallop Oval Punch, Billboard Alphabet die for the Big Shot, Birds & Blooms Sizzlits for the Big Shot, 5/8" Old Olive Grosgrain Ribbon, Crop-a-Dile, 2-Way Glue Pen
 The Decor Elements Growth Chart (#117519, $24.95) is only available until September 30. Order now from my online store and you'll get a free applicator to apply it! Go to my website at juliedavison.stampinup.net and click "Shop Now".
Growth charts not your thing? Click here to check out our other easy-to-apply Decor Elements.
 I used the bird from the Birds & Blooms Sizzlits to creater markers with each child's name to mark their height.
 We don't plan to be in this house forever, so I don't want to leave marks on the wall (that's one thing I love about Decor Elements is that you can remove them without leaving a mark!). I made the bird markers movable and will take a picture of the kids by the growth chart marker so that we'll have a record on how tall they are at various milestones. Here is the little book I made up for the pictures.
 The pages are 5" x 5" Kraft cardstock. I used the Crop-a-Dile to punch holes and bound them together with a 1" binder ring. The tree trunk & bird on the cover are from the Season of Friendship stamp set and the tree top and leaves are from the Scallop Circle Punch.
 Supplies: Growth Chart Decor Elements, Season of Friendship, Kraft cardstock, Regal Rose cardstock, Sage Shadow cardstock, Chocolate Chip ink/marker & cardstock, Whisper White cardstock, Large Oval Punch, Scallop Oval Punch, Billboard Alphabet die for the Big Shot, Birds & Blooms Sizzlits for the Big Shot, 5/8" Old Olive Grosgrain Ribbon, Crop-a-Dile, 2-Way Glue PenThe Decor Elements Growth Chart (#117519, $24.95) is only available until September 30. Order now from my online store and you'll get a free applicator to apply it! Go to my website at juliedavison.stampinup.net and click "Shop Now".
Growth charts not your thing? Click here to check out our other easy-to-apply Decor Elements.
Tuesday, August 18, 2009
Sunflower Thank You Cards
Have you noticed a new trend with weddings lately -- everyone seems to be using bright colors on their stationary and wedding party attire. An old friend of mine is getting married over Labor Day weekend and their invitations are beautiful -- with bright, bold sunflowers! I volunteered to make some thank you notes for them and was expecting to do a simple monogram with our new Bride or Groom DSP, but I don't think that would coordinate so well. So I borrowed a retired Sunflower stamp set (thanks Sherla!) and came up with some quick sunflower designs. I'm still waiting to hear which one they like best.
 The white cards are the pre-packaged Notecards and Envelopes (pkg of 20, #107311, $5.95). I love that they are cut, scored, and ready to go!
 For this card, I stamped an entire sheet of Whisper White cardstock and cut it into pieces to make up quick cards with a little more color.
Supplies: DD Sunflower stamp set, Thank You Kindly, Notecards & Envelopes, Always Artichoke ink & cardstock, Soft Suede ink, Summer Sun ink, Crushed Curry ink & cardstock
Monday, August 17, 2009
Welcome Baby Bug Card
For someone who makes cards and sells stamps as a career, I am ridiculously behind on baby cards. The problem is that I want to send more than just a card and that is what usually holds the whole thing up. I have a couple gifts ready to go finally, so I made up these cute baby bug cards to send off with the gifts.
 The finished card size is 3" x 5". I used a leftover piece of Certainly Celery cardstock and folded it in half.
Supplies: Love Bug, Short & Sweet, Jet Black Staz-On ink, Whisper White cardstock, Orchid Opulence marker & cardstock, Old Old marker , Certainly Celery marker & cardstock, Rich Razzleberry ink/marker & cardstock, Rich Razzleberry Polka Dot Ribbon, 1-1/4" & 1-3/8" Circle Punches, Scallop Circle Punch, Cottage Wall DSP
Sunday, August 16, 2009
Smiling Pumpkins Need Makeover
Last night I was stamping with my new Twick of Tweet set -- a cute little Halloween stamp set form the Holiday Mini catalog. I'm trying to design a card for our demonstrator card swap. I got started with one idea, but I feel like it's missing something. I just can't put my finger on what else it needs.
 Help me makeover this card! Leave me a comment and let me know what you think should be added or changed to make this card better. I'll work on it some more and post a final version later this week.
Finished card size is 3-1/2" x 5".
Supplies: Twick of Tweet, Whisper White cardstock, Jet Black Staz-On ink, Old Olive marker & cardstock, Pumpkin Pie marker, Top Note Die for the Big Shot, 1/4" Basic Black Grosgrain Ribbon, Cast-a-Spell DSP
Friday, August 14, 2009
Pop Up Card Tutorial
This was one of my stamp club projects last month. I love the way it turned out with the new Butterfly punch and Thoroughly Modern Designer Paper and color combination!
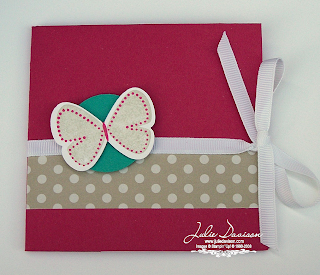
 I saw the pattern for this card in the July 2009 issue of Stampin' Success -- it's the monthly magazine that demonstrators get for free! It's always filled with patterns, new techniques, and fresh ideas -- not to mention great business tips. It's only available to demonstrators though. Click here for more information on how you can join my team for as little as $85 and get this magazine in YOUR mailbox each month.
Of course I won't make you sign up to be a demonstrator just to learn how to make this card! Click here for step-by-step instructions and measurements for making this project.
Supplies: Flight of the Butterfly, Full of Life, Rose Red ink & cardstock, Whisper White cardstock, Bermuda Bay ink & cardstock, Sahara Sand ink, Thoroughly Modern DSP, Scallop Circle DSP, 1-3/8" Circle Punch, Butterfly Punch, 1/4" Whisper White Grosgrain Ribbon, Stampin' Sponges, Stampin' Dimensionals
Friday Freebie #5
 It's Friday! Time to give away another freebie! These two items are left over from my customer appreciation night in June and have been sitting on my floor for the last month. I must have dumped out the basket they were in...so it's time to send them off to someone else!
New to Friday Freebies? Here's how it works: Each Friday I will choose one person to win my freebie (which may range from a stamped project to free product). I will choose the winner from all of the comments left on other posts during the previous week (Saturday-Thursday).
And the winner is....
-
Congrats to everyone! That little matchbox is just ADORABLE!
Thursday, August 13, 2009
Butterfly Diorama Card & Goodies from Convention
Sigh. I'm still getting back into the swing of things...and already falling behind. I have to stop crashing on the couch after I get the kids to bed!
I had planned to do some stamping last night and among other projects, break out some of my new stamps. Check out all these goodies I brought home from Convention!
 This was the stamp sets that came in our bag and a door prize I won, and stamp sets I got for awards, and another one for helping out at a meeting, and some other goodies from my "You Crew" experience. That was pretty cool -- Stacey got "You Crew"ed and picked me and three others to join her one morning to meet with two of the gals in the Design department at Stampin' Up!. We got to find out how they plan and coordinate designing samples for the Stampin' Up! Catalog and ask lots of questions. They didn't give us any sneak peeks, but I was amazed to learn they are getting ready to stamp for NEXT YEAR'S catalog!! We when raved about this year's In Colors, they said, "Wait till you see next year's!" Can't wait!
Since I don't have anything brand new to share with you, here's a picture of another diorama card I made before Convention. (Click here to see my other diorama card.)

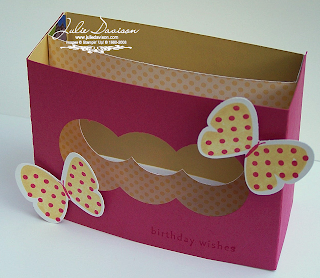 I love how the Butterfly punch coordinates with the Flight of the Butterfly stamp set! I am photographing another project today that uses this combination. It was our stamp club project last month and it's really cute! Watch for more details and a tutorial in the next couple days!
Supplies: Flight of the Butterfly, Wow Flowers, So Saffron ink & cardstock, Rose Red ink & cardstock, Tall Tales DSP, Butterfly Punch, 1-3/8" Circle Punch, 1-1/4" Circle Punch, Sticky Strip
Tuesday, August 11, 2009
Rising Star Matchbox & Convention Highlights
I'm back from Convention! What a blast! I enjoyed spending the week with members of my downline. We learned lots -- great business tips, new project ideas and techniques -- and celebrated lots!

Before I left, I made up this little matchbox to give to my downline with a little bracelet. I forgot to take a picture of the bracelet. Anyway, you know who loves jewelry -- Ms Stacey Schafer. We were beyond thrilled on check-in day to learn that she made Founder's Circle and was one of the Top 15 Rising Stars (demonstrators in their first full year)!! I felt like such a proud mom -- I was CRYING at the Awards Booth! Can you believe I actually had to talk her into even signing up!?! After I helped her with her first open house, she just took off...and on Awards Night was recognized as #13 in the Rising Star category. Way to go, Stacey!!

[From Left: Stacey; Kim Peck (my upline & #9 Demonstrator of the Year!!); our SAM, Terri Allen; me; and my mom, Susan La Croix]
If you've been thinking about becoming a demonstrator, now is a great time! The $85 Mini Kit makes this opportunity very affordable. Click here for all the details and find out about my special bonus gift if you sign up by August 31. I would love to help YOU become the next Rising Star!
Here's a photo of all the Ju-bilant Stampers who attended Convention this year. We had so much fun! Would you like to join us next year?
 Here's a picture of me and my Mom after we walked on stage together for the Southern Caribbean Incentive Trip. I am soooo excited that we get to go together!
 Back to that little matchbox...I used the Matchbox die for the Big Shot and added some strips of window sheet to the inside side of the box to make the stars pop up when you open the box. (Side note: use sticky strip for this!)
 Supplies: Starring You, Crushed Curry marker/ink & cardstock, Melon Mambo marker & cardstock, Whisper White cardstock, Razzleberry Lemonade DSP, Large Oval Punch, Scalloped Oval Punch, Small Star Punch, Window Sheets, Matchbox die for the Big Shot

Before I left, I made up this little matchbox to give to my downline with a little bracelet. I forgot to take a picture of the bracelet. Anyway, you know who loves jewelry -- Ms Stacey Schafer. We were beyond thrilled on check-in day to learn that she made Founder's Circle and was one of the Top 15 Rising Stars (demonstrators in their first full year)!! I felt like such a proud mom -- I was CRYING at the Awards Booth! Can you believe I actually had to talk her into even signing up!?! After I helped her with her first open house, she just took off...and on Awards Night was recognized as #13 in the Rising Star category. Way to go, Stacey!!

[From Left: Stacey; Kim Peck (my upline & #9 Demonstrator of the Year!!); our SAM, Terri Allen; me; and my mom, Susan La Croix]
Here's a photo of all the Ju-bilant Stampers who attended Convention this year. We had so much fun! Would you like to join us next year?


 Supplies: Starring You, Crushed Curry marker/ink & cardstock, Melon Mambo marker & cardstock, Whisper White cardstock, Razzleberry Lemonade DSP, Large Oval Punch, Scalloped Oval Punch, Small Star Punch, Window Sheets, Matchbox die for the Big Shot
Sunday, August 9, 2009
Matchbook Treat Cover
I wasn't going to make any 3-D swaps for Convention, but I already had bought the candy and didn't want to eat it all myself! I kept it very simple and made a little matchbook treat.
 The cardstock is 3" x 8-1/2", scored at 3/4" and 4-3/4". Fold the 3/4" flap up and add a staple. Then fold the other part down and tuck it in the stapled flap. I added the candy with a pop-up glue dot in the inside center.
 Supplies: Animal Stories, Teeny Tiny Wishes, Rose Red ink & cardstock, So Saffron marker, Chocolate Chip ink & cardstock, Whisper White cardstock, Tall Tales DSP, 1-1/4" & 1-3/8" Circle Punches, Scallop Circle Punch, 1/4" Chocolate Chip Grosgrain Ribbon, Stapler, Pop Up Glue Dots
Subscribe to:
Posts (Atom)