Monday, February 28, 2011

Build a Blossom Butterfly

Oh my heavens! Don't you just love it when you find other ways to use your stamps and punches?! When I saw this Build a Blossom butterfly by nmdeedster on SCS, I knew I would be CASEing it. I kept the same colors even! The butterfly is made with the Build a Blossom stamp set from the Occasions Mini catalog and coordinating Blossom Petals Punch. I used three large petals: two for the top wings and the third cut in half for the bottom wings. The body is the medium petal punched in Basic Black cardstock.

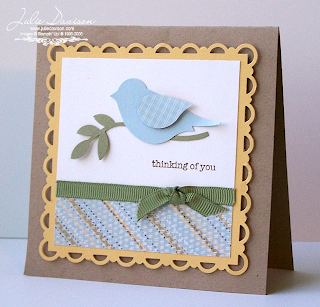
About the only thing I did change from the original card was the layout -- I made it a 4-1/4" x 4-1/4" square card. Did you notice that I used the Framed Tulips embossing folder -- but I made it a square?! {squeal!} I don't even remember where I first saw that. Someone else thought of it first and wow, is that genius, or what!?!

I used a 4" x 4" square for this card. Line it up on one end of the embossing folder and send it through the Big Shot like normal. Then, flip the cardstock so the un-embossed end is at the end. Line up the embossed tulips into the grooves of the embossing folder. Run it half way (or less even) and then roll it BACK OUT. Basically, you emboss just the edge and then back it out before it messes up the other end. The sides get re-embossed, but if you line it up in the grooves, it doesn't change the pattern.

Does that make sense? I've been meaning to take a photo to give you a visual, but I missed my daylight opportunity yet again today. Leave me a comment if you want a photo and I'll work on posting it this week with my other Framed Tulips Embossing Folder sample!

Stampin' Up! Supplies: Build a Blossom, Tiny Tags, So Saffron ink & cardstock, Basic Black marker/ink & cardstock, Whisper White cardstock, Pear Pizazz cardstock, Blossom Petals Punch, Smooch Pearlized Accent ink, Framed Tulips Embossing Folder (Big Shot), Stampin' Dimensionals

Click HERE to Order Stampin' Up! Products Online, Anytime!

Saturday, February 26, 2011

MDS Sunny Hello Cards

I love the colors on this card that I designed with My Digital Studio. They are so bright and sunny: Daffodil Delight, Pumpkin Pie, Old Olive, and Rich Razzleberry. Can you tell I'm ready for summer!? I love the colors and the embellishments, but I couldn't decide which layout I liked better: bottom corner or centered. Leave me a comment and let me know what you think!

Speaking of "voting" -- I need your help deciding something else! I've picked finalists for my first Facebook Fan Challenge ("Think Pink") and now it's time to select the winners! Check out my the contest photos on my Facebook Page and simply "Like" your favorite project photo to vote. You have to be a Fan to vote. Not a Fan yet? Simply click "Like" on my main Facebook Page and you're a Fan! Thanks for helping me pick a winner! I'll be announcing the winner Monday night and posting a new challenge next week!

Click HERE to Order Stampin' Up! Products Online, Anytime!

Friday, February 25, 2011

Ice Cream Parlor 3x3 Notes

I'm trying to catch up on thank you notes and packages today, but my sick little ones and their shenanigans kept me from getting much done. To top it off, I think I'm catching their cold/bug. I should go to bed early....but before I do that, here's some quick 3x3 mini thank you cards I made up a few weeks ago. I love the coordinating Ice Cream Parlor Designer Paperand Quick Accents. It's one of the free gifts you can choose when you order $50 or more during Sale-a-bration. Click here for promotion details.

Stampin' Up! Supplies: So Happy For You (SAB), Pacific Point ink, Daffodil Delight cardstock, Ice Cream Parlor DSP & Quick Accents (SAB)

Click HERE to Order Stampin' Up! Products Online, Anytime!

Thursday, February 24, 2011

Birthday Peek-A-Boo Gift Card Holder

When you don't know what to get for someone's birthday, let them pick their own gift! Here's a birthday version of the Peek-A-Boo Gift Card Holder I shared at Christmas time. (Click here for the tutorial.) It's the perfect way to give a gift card!

Did you know I have gift certificates available in any denomination? I love it when a stamper's friend or family member calls me to help with their gift-giving. In fact, I'm mailing a gift certificate this afternoon! I'll include a hand-stamped card and mail it directly to the recipient if you'd like. I can accept payment with a credit card via Paypal or by check. Please email me for more information about gift certificates.

Stampin' Up! Supplies: Party Hearty, Rich Razzleberry ink & cardstock, Melon Mambo marker & cardstock, Whisper White cardstock, 1-3/4" Scallop Circle Punch, 1/4" Whisper White Grosgrain Ribbon

Click HERE to Order Stampin' Up! Products Online, Anytime!

Tuesday, February 22, 2011

"So Happy For You" Treat Box

Here's another project from my "So Happy For You" project sheet. You can get the project sheet free when you place an order with me in February. Click here to learn more about the "So Happy For You" Getting Started Bundle.

This is a basic 2-4-6 box, using just a half sheet of regular cardstock. Click here to see the instructions posted with another project. This box makes a great favor for a shower or party and it so easy to duplicate.

Stampin' Up! Supplies: So Happy For You (SAB), Real Red ink & cardstock, Basic Black ink & cardstock, Whisper White cardstock, Paper Cutter & Scoring Blade, 1-3/8" Circle Punch, 1/4" Whisper White Grosgrain Ribbon, Stampin' Dimensionals, Rectangle Hole Punch

Click HERE to Order Stampin' Up! Products Online, Anytime!

Monday, February 21, 2011

"So Happy For You" Birthday Wishes

One of my workshop hostesses earlier this month requested that I show some ideas using limited supplies. So I came up with a "Getting Started Bundle", designed especially for new stampers, that included a little bit of everything and then created projects using ONLY those supplies. It was a fun challenge and I'm so happy with the way these clean and simple designs turned out! Here's one of the cards:

The "So Happy For You" Getting Started Bundle includes:
  • Getting Started Stampin’ Spots, #119979, $21.95
  • Getting Started Assorted Cardstock, #120954, $6.95
  • 1-3/8” Circle Punch, #119860, $15.95
  • ¼” Whisper White Grosgrain Ribbon, #109025, $4.95
  • Stampin’ Dimensionals, #104430, $3.95
  • So Happy for You Stamp Set, #121853, FREE during Sale-a-bration
Subtotal = $53.95 + tax & s/h

I created a PDF that includes photos of all the projects and instructions to share with those workshop guests. But as a special gift, I am also sending it to all of my customers who place an order with me in February! Thank you for supporting my business!!

Click HERE to Order Stampin' Up! Products Online, Anytime!

Saturday, February 19, 2011

Top 5 of February 2010

It's time to rewind! I looked over my posts from last February and choose my top 5 favorite projects to share with you again. Click on each photo for more details about the project. Click here to see all my February 2010 blog posts.

Click HERE to Order Stampin' Up! Products Online, Anytime!

Friday, February 18, 2011

Elegant Soiree Bliss Card & Video

I'm a busy mom. And as much as I love to stamp, I simply don't get as much time as I'd like to do it. That's one reason that my cards are usually very clean and simple. That's just my style. I try to extract beautiful elements and keep the design easy to duplicate. Here's a card using the "Bliss" Sale-a-bration stamp set from Stampin' Up! You can get it free with a $50 purchase. (Click here for promotion details.)

I actually made this card for a group swap. One of my favorite things about being a demonstrator is swapping cards at demonstrator meetings or Stampin' Up! events. We have so many talented stampers in our group. I love being able to swap ideas and get beautiful samples to inspire my customers -- and me! There's a great start-up special going on right now. If you'd like to join our group as a demonstrator, please contact me or click here for details.

"Bliss" is one of my favorite of the Sale-a-bration gifts this year. Check out this video from Stampin' Up! for a few more ideas using this stamp set.


I was inspired by the FTL122 sketch from Clean & Simple Stamping blog when I made this card.

Stampin' Up! Supplies: Bliss, Soft Suede ink, Baja Breeze ink & cardstock, Very Vanilla cardstock, Crumb Cake cardstock, Elegant Soiree DSP, Scallop Edge Punch, 1/8" Very Vanilla Taffeta Ribbon, Rhinestone Jewel Accents

Click HERE to Order Stampin' Up! Products Online, Anytime!

Wednesday, February 16, 2011

Morning Cup Tea Bag Holder

I made this project with my Stamp Club last month. It's a simple pocket holder and could be used for other things besides tea!

I paper pierced the teapot on the front cover. I stamped it on the Very Vanilla cardstock and then again on the Elegant Soiree DSP and then cut out the body of the teapot on the DSP and glued it over the cardstock. I used a marker to color in the hands on the side and top.

The cardstock for the holder is 3-1/2" x 10-1/2". I scored it at 3-1/2" and 7", created three sections that measure 3-1/2" x 3-1/2". Then I cut the end panel diagonally. The diagram/picture I took below is kind of backgrounds -- the cardstock is facing down instead of up, so the pocket flap appears on the opposite end. If you fold on the score lines back toward the table and flip the card around you'll be all set. (See the inside photo above.)

(click on photo to enlarge)

Stampin' Up! Supplies: Morning Cup, Basic Gray ink & cardstock, Baja Breeze ink/marker, Very Vanilla cardstock, Vintage Brads, 1-1/6" Hole Punch, 1/4" Basic Gray Taffeta Ribbon (this is now retired, so I would substitute Very Vanilla instead), Paper Cutter, Sticky Strip, Stampin' Dimensionals


Click HERE to Order Stampin' Up! Products Online, Anytime!

Tuesday, February 15, 2011

"Guess How Much I Love You" Cards

Did you have a Happy Valentine's Day? I missed posting because I was spending some time with my sweetie. We didn't do much and actually fell asleep on the couch kind of early, but there's something about just sitting and "being there" together. Instead of holing up in the office as I often do, I decided to take the night off to be with my hubs. I hope you were also enjoying some time with loved ones.

Over the last several years, I've really made an effort to make Valentine's Day more of a celebration about the kids and less about flowers and date nights. We get heart-shaped pizza for dinner and break out the heart-shaped cookie cutters to cut everything from Jello Jigglers to pancakes and sandwiches. I help the kids make their valentines for friends at school (which I somehow forgot to take pictures of!?!) and I also made special cards for them. You may remember my cards from last year. (Click here to see them.) I hope to continue this each year and make them cards that express how much we love them individually and at the same time, capture some of what makes them special as they grow and change each year.

Here is what I came up for their 2011 valentines:

The front is very simple. I printed the text on Whisper White cardstock and then added the punched hearts.

On the inside, I die cut Scallop Envelopes from designer series paper. In each envelope were heart punch-outs, on which I wrote comparisons of how much I loved them. Each one was different. Each kid had 3-4 hearts in their envelope. Here's a sample of each of the kids:
  • Thomas - I love you..."More than every level of every Mario game," (He LOVES Super Mario Bros.)
  • Claire - I love you..."More than all the stuffed animals in your bed" (Sometimes I don't know how there is room for her!)
  • Elise - I love you..."More than all the twinkle stars in the sky" (Her favorite song to sing)
  • Anna - I love you..."More than all the jars of baby food you won't eat" (She's almost 9 months old and still refuses to eat baby food. We're starting to give her table food, which she loves.)
I plan to save their valentines each year and I hope someday they will appreciate the glimpse into their childhood and know how very much we love them!

Click HERE to Order Stampin' Up! Products Online, Anytime!

Sunday, February 13, 2011

Button Bracelet Class & "To Go" Kit

My upline, Kim Peck made these super cute bracelets for us as Leadership gifts. I knew when I saw it that I just had to do a class! Join me in Champaign on Wednesday, March 2nd to make your own bracelet. You can choose which color family you want: Subtles, Neutrals, Bolds, or Regals (not shown). Can't decide? Make two!

Can't attend or live too far away? No problem! You can get a bracelet kit "to go" and I'll mail your supplies and send you a .pdf with step-by-step instructions to make your bracelet.

Please sign up by February 22nd, so I have enough time to order the buttons. Email me to sign up to attend the class in person or use the buttons below to purchase your project kit to be mailed. Kit orders will be shipped on March 1st or 2nd.


1 bracelet - $9.95 + s/h


2 bracelets - $16.95 + s/h

Click HERE to Order Stampin' Up! Products Online, Anytime!

Thursday, February 10, 2011

Punch Bunch Card & My Digital Studio Catalog

Here's another digital design I created with My Digital Studio and the So Much to Sale-a-brate Digital Content CD. (You can earn the CD FREE during Sale-a-bration with a $50 order.) I haven't had a chance to print this card yet, so here's the digital image:

If you use My Digital Studio, you will be happy to hear that Stampin' Up! has published a pdf catalog of all of the images available! This is a great way to keep track of what you already have and to view the images at a glance. You can find it on MyDigitalStudio.Net under Resources. MyDigitalStudio.Net is a great resource for all MDS users. You'll find samples, tips, and even videos to walk you through using My Digital Studio. If you haven't explored it yet, log on today!

Click HERE to Order Stampin' Up! Products Online, Anytime!

Wednesday, February 9, 2011

Bold Blossom "Snip & Tuck" Card

If you downloaded the tutorial I shared yesterday, you've already seen today's card. It's another one of the "Snip & Tuck" cards. I did this version with my Stamp Club last month. We needed the bright springy colors to chase away the winter blues. And the Bold Blossom stamp set was perfect for the job!


Stampin' Up! Supplies: Bold Blossom, Regal Rose ink & cardstock, Pear Pizzazz ink & cardstock, So Saffron cardstock, Whisper White cardstock, In Color Patterns DSP, Scallop Edge Punch, Scallop Circle Punch, 1-3/8" Circle Punch, Subtles Brads,1/4" Whisper White Taffeta Ribbon, Paper Piercing Tool, Paper Cutter (or Scissors), Stampin' Dimensionals

Click HERE to Order Stampin' Up! Products Online, Anytime!

Tuesday, February 8, 2011

"Snip & Tuck" Fun Fold Card & Tutorial

Bonnie Thurber demonstrated this "Fun Fold" technique on stage at the Stampin' Up! 2011 Leadership Conference. I've dubbed it the "Snip & Tuck" card and put together a tutorial so you can make one at home!


The first sample uses the Clearly For You stamp set from the Occasions Mini Catalog, but the card on the tutorial features the Bliss stamp set (one of the free gifts you can select during Sale-a-bration with a $50 order).

Supplies: Clearly for You, Bliss (SAB), Basic Black ink & cardstock, Rose Red marker/ink & cardstock, Crumb Cake ink & cardstock, Very Vanilla cardstock, First Edition DSP, Decorative Label Punch, Large Oval Punch, Scallop Oval Punch, Scallop Edge Punch, 1/8" Basic Black Taffeta Ribbon, Paper Piercing Tool, Paper Cutter (or Scissors), Stampin' Dimensionals

Click HERE to Order Stampin' Up! Products Online, Anytime!

Sunday, February 6, 2011

Digital vs Hybrid Sale-a-bration Cards & Video

I'm still having fun playing around with my So Much to Sale-a-brate Digital Content CD from Stampin' Up! (Click here to see what else I've been making with My Digital Studio.) I designed this card and printed it using my home printer, then added some additional elements: the Ice Cream Parlor Quick Accents, Buttons, and coordinating ribbon. Here's the hybrid card:

I added the same elements on the digital design. This is how it looks:

Whether you're doing a full digital design or a hybrid project, there are so many options with the new So Much to Sale-a-brate CD! Check out this video from Stampin' Up! for even more ideas.


Click HERE to Order Stampin' Up! Products Online, Anytime!

Saturday, February 5, 2011

Medallion Valentine Card & Mini Tutorial

I designed this card for Gilda's party last month. She spotted the medallion on page 13 of the Occasions Mini Catalog and said, "I want to know how to make that!". So I said, "OK!" That's the great thing about hosting a party with me -- you tell me what you want to learn and I do my best to accommodate! Needless to say, Gilda was very happy with this project at her workshop!

Want to know how I made it? Check out this mini tutorial that I found in the Sale-a-bration 2009 brochure:

(Click on the image for a larger view.)

I used a 12 x 1-1/4" strip of the First Edition DSP and scored it at every 1/4". I adhered the ends together and then flattened it to make the medallion.

I usually don't use retired products at my workshops, but I did use some old DSP for the background on this card. I justified it because technically, it is still available. You can get it 60% off in the Clearance Rack of my Online Store: Sending Love Designer Paper, #117153, SALE: $4.99. This series is beautiful with the spot glitter. It's great for Valentine's Day, but has so many other uses. Check it out here and buy some before it's all gone! And don't forget, you'll get a free Sale-a-bration gift for every $50 that you order!

Have you made your valentines yet? I'll be working on cards with the kids this afternoon. I'll be sure to post our creations, so stay tuned!

Supplies: Be My Valentine (I cut and used only the banner from this individual stamp in the Occasions Mini), Basic Black ink, Red Glimmer Paper, Very Vanilla cardstock, First Edition DSP, Sending Love Designer Series Paper, Sticky Page, Full Heart Punch, Stampin' Dimensionals

Click HERE to Order Stampin' Up! Products Online, Anytime!

Blog Candy Winners!

Oops! I forgot to pick the winners for the 550K Blog Candy yesterday! Thanks for being so patient!

I used Random.org to choose two winners and they are:
Christina said on January 31, 2011 8:30 PM

WOW! Congratulations on your blog hits!! I LOVE following your blog. I have purchased from you in the past...matter of fact...I JUST now got the owl kit done! LOVE that project, can't wait to my own ideas with the owl punch. I am from Granger Indiana!!

Kay said on February 1, 2011 7:52 AM

Hi Julie! I have followed your blog for some time. I am always amazed at your creativity! Thanks for all your inspiration! I am from Sheridan, Wyoming but now live in Casper, Wyoming. I LOVE your calendars-THANKS for the chance to win ONE!!!!

Ladies, please send me an email with your address and I will mail your calendars to you on Monday.

Thank you everyone for all your sweet comments! If you didn't win, that's okay! I have more calendars available and you can still purchase one for yourself. Click here for all the details. If you send payment this weekend, I will mail it out on Monday. And while supplies last, I will continue to send them FREE if you place an order on my website in February.

Click HERE to Order Stampin' Up! Products Online, Anytime!

Thursday, February 3, 2011

Sweet Summer, Supersized

Here's another card I created with the Sweet Summer digital stamps available on the So Much to Sale-a-bration CD. I "supersized" the flower and printed it out to fit the width of the card. Then I colored it in with my Stampin' Write markers (Peach Parfait, So Saffron, and Pear Pizzazz) and added Dazzling Diamonds glitter with the 2-Way Glue Pen. It's so sparkly and pretty in real life.

And I have to do a close-up of the embellishment. I put a Rhinestone Jewel Accent in the middle of this Whisper White flower button from the Neutrals collection.

Stampin' Up! Supplies: So Happy For You (SAB), So Much to Sale-a-bration Digital Content CD (SAB), My Digital Studio, Peach Parfait marker, So Saffron marker & cardstock, Pear Pizzazz marker, Whisper White cardstock, Basic Black ink, Ice Cream Parlor DSP & Quick Accents (SAB), Neutrals Buttons, 2-Way Glue, Dazzling Diamonds Glitter, Rhinestone Jewel Accents, Mini Glue Dots

Click HERE to Order Stampin' Up! Products Online, Anytime!

Wednesday, February 2, 2011

Got Digi Stamps? Stampin' Up! Does!

Did you figure out how I made yesterday's Sweet Summer card without rubber stamps and ink? I used Digi Stamps! The Digital Stamps on the So Much to Sale-a-brate Digital Content CD (available as a free Sale-a-bration gift when you purchase $50+ in Stampin' Up! products) are designed to be used with My Digital Studio, but will also work with other design software.

So how did I make the card? I opened a Multiple Output canvas in My Digital Studio and "stamped" the image in Soft Suede. Then I printed it out on Whisper White cardstock and used it on my card just like I had stamped it with regular ink!

The beauty of Digital Stamps is that you can change the size of the image to fit your project. I love the images in the Sweet Summer Sale-a-bration stamp set, but they are kind of small. So I printed them a little larger and colored with my Stampin' Write markers to create this card:

If you like Digital Crafting, you should take a look at My Digital Studio. Even if you don't use the program itself, it includes over 2,000 elements -- $500 worth of digital content -- for only $79.99. And when you purchase My Digital Studio during Sale-a-bration, you'll qualify to get the So Much to Sale-a-brate Digital Content CD for FREE! Click here to view a flyer with more information about My Digital Studio. Or view it in my Online Store here.

In addition to the Digital Stamp Brush Sets available with the software, you'll find dozens of other Digi Stamps in my Online Store. Click here to see them all. In fact, Stampin' Up! is releasing new digital content almost every week! All Digital Content is available to purchase online and can be immediately downloaded!

Here's another sample where I printed the Digital Stamp from the So Much to Sale-a-bration Digital Content CD and then colored it in with markers and put it on my card like a regular stamped image. I incorporated some of the other Sale-a-bration gifts: the Ice Cream Parlor DSP & Quick Accents and the Ice Cream Parlor Ribbon & Button Pack, and the So Happy For You stamp set. I love how everything coordinates! Don't you just want it all!?

Stampin' Up! Supplies: So Happy For You (SAB), Basic Black ink, Melon Mambo marker & cardstock, Daffodil Delight marker & cardstock, Old Olive marker & cardstock, Whisper White cardstock, So Much to Sale-a-brate Digital Content CD (SAB), My Digital Studio, Ice Cream Parlor DSP & Quick Accents (SAB), Ice Cream Parlor Ribbon & Button Pack (SAB), 1-3/4" Circle Punch, 2-3/8" Scallop Circle Punch, Mini Glue Dots

Click HERE to Order Stampin' Up! Products Online, Anytime!

Tuesday, February 1, 2011

Sweet Summer Sale-a-bration Card & Video

This 4-1/4" x 4-1/4" card caught my eye the first time I looked through the Stampin' Up! Sale-a-bration 2011 brochure. I copied it completely from the brochure.

Check out this video from Stampin' Up! to see how this card comes together.


Want to know a secret?! I made this card without using stamps and ink! Huh!? Can you guess how? I'll fill you in on my secret tomorrow and show you two more cards that I made using the same technique!

Click HERE to Order Stampin' Up! Products Online, Anytime!

Free Stamp Set of the Month: Yummy

Thanks to everyone who placed an order with me in January! I drew one winner from all of the online and email orders and Shelley from Pontiac is the lucky stamper to win the Goody Goody Gumdrops stamp set! Congratulations, Shelley!

It's a new month, and time for a new free stamp set giveaway! Each month, I will give away a free stamp set. To be eligible for the drawing, all you have to do it place an online order (email orders count too!) that is not part of a club or workshop. You'll get one entry for each order that you place with me between February 1-28 . I'll draw a winner on March 1st. This month's stamp set is Yummy -- perfect for making tags and gifts!

Speaking of gifts, don't forget that you'll also get a free gift this month for every $50 that you order as part of our Sale-a-bration promotion. Click here for more details.

Click HERE to Order Stampin' Up! Products Online, Anytime!